Tried and true gluten free recipes: Cream puffs and dairy free vanilla bean and lemon custard
Long story short- I can’t eat gluten. Not that I don’t want to but I shouldn’t for medical reasons. When I found out, I was literally devastated and scared. How the heck will I survive?! I could live on bread! I’ve always joked that working in a cake shop is not a temptation for me. Working in a bakery, totally different story. I would have been 150lbs in no time. True story!
The scariest part of going gluten free was how I had absolutely no idea of it. Let me tell you, gluten free baking IS HARD. I won’t lie to you, I’ve cried in the kitchen plenty of times now ( yeah, and I have a ton of experience baking, can’t imagine how that feels for people who don’t have any). Ready made stuff rarely tastes good and the good stuff is expensive. So, I decided to experiment. Jumped head down into gluten free and didn’t look back.
So, I will not go into too much detail, because I am sure I will have plenty of time to do that later on. Instead, I will post a recipe by popular demand. The recipe that I am going to post now, I got from Robert Landoplhi’s book ” Gluten-free baking: Delectable from-scratch sweet and savory treats”.
I highly recommend the book, I made a couple of things from it so far and everything seems to be spot on.

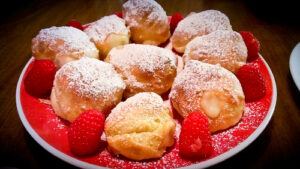
I decided to try the cream puffs because I was dying to eat something sweet and I wanted to try something with custard. So, cream puffs filled with custard sounded great. When I posted the pictures on Facebook, people found it impossible that these are gluten free. Well, they are! And they were delicious!
Here is the recipe.
For the Cream Puffs
1/2 cup white rice flour
1/4 cup potato starch
1/4 cup tapioca flour ( I used arrowroot flour)
1/2 tsp Xantan gum
1/4 tsp gluten-free baking powder ( yes, there is a special one)
1/8 tsp salt
1 cup water
3 tbs butter
3 large eggs
Preparation for Cream Puffs
1. Preheat the oven to 350F ( the original recipe calls for 400F, but I have a convection oven and I found that 400 is too high for me).
2. Mix the dry ingredients- flours, Xantan gum, baking powder and salt.
3. Combine the water and butter in a medium sauce pan over medium heat; bring to a boil.
4. When the water boils, mix in the flour ( all at once) with a wooden spoon and stir well until the dough pulls away from the sides of the pan. It happens very quickly, so pay attention and stir well.
5. Transfer into a mixer bowl. I am lucky to have a stand up mixer, but if you don’t, just use a wooden spoon, a hand mixer with dough attachments or just a plain old metal spoon to mix in the eggs one by one until the dough is very smooth. ( Note: the dough will be sticky!)
6. On parchment paper spoon 1 tablespoonful of the dough. Place next spoon 2 inches apart.
Bake for 15-16 min or until golden on top. Leave the cream puffs to cool completely on the tray!
7. When completely cool, cut or fill with filling of your choice.
I found that I get about 20 pieces that are a good size.
*************************************************************
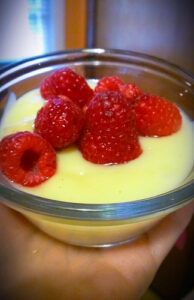
Ingredients for the vanilla bean custard
4 cups coconut milk ( the recipe calls for regular one, but I used coconut)
4 large eggs ( the recipe called for egg yolks only, but I like using the whole egg)
1 vanilla bean split lengthwise
1/2 cup sugar
1/3 cup cornstarch
1/4 tsp salt
2 tablespoons butter, softened
Cooking spray
Preparation for vanilla bean custard:
1. Combine the milk and eggs in a large mixer bowl. Beat until they are frothy, then add the vanilla bean (scrape off the seeds, but leave the stem stay in the mixture while you are working, you will take it out later).
2. Combine the dry ingredients ( sugar, cornstarch, salt) then add the milk gradually as you stir constantly.
3. Cook over medium heat for about 12 minutes or until the mixture comes to a boil and begins to thicken. Remove from heat, stir in butter. Take the vanilla bean pod out and add lemon zest.
At this point you can either let it cool completely or you can put in ramekins with fruit, if you want to serve it just as pudding.
Enjoy! And if you have any questions, don’t hesitate to ask!